THE VILLAGERS OF COLLINGHAM AND LINTON WHO SERVED IN WORLD WAR ONE
COLLINGHAMANDDISTRICTWARARCHIVE.INFO
 CONTACT


Rank Able Seaman
Service Number 237998
Service Royal Navy
Ship
Trade or Occupation pre-war: Royal Navy
Marital status: Single
* Taken from attestation papers or 1911 census
** Marital status on enlistment or at start of war
- Named on printed lists of villagers in The Wetherby News or Collingham Parish Magazine
Biography
In December 1914, the Collingham Parish magazine published a list of men associated with the village who it said were serving in the Great War. One of those men was Ernest Power, and the magazine went on to say that he was serving in the Royal Navy aboard HMS Severn. These facts have allowed us to trace his service, but the connection to Collingham is still opaque.
We were able to find that an Ernest Power, with a service number of 237998 had been serving on HMS Severn from the 7th August 1914 to the 15th January 1916, the exact period when the parish magazine was published. Ernest's naval record lists his full career in the Navy, but importantly gives us his date of birth as 21st February 1891. The record also states that Ernest was born in Leeds and that he was a plumber. Ernest had first joined the Navy on the 4th January 1907.
Family background
Armed with his date of birth, we were able to trace Ernest's family. Ernest was the son of James and Jane Anne Power who were living at 38 Bachelor Street, Leeds at his birth. Ernest was baptised at St.Saviour's Church, Leeds on the 12th March 1891. A few months later, on census day 1891, the family were at the same address, and consisted of James, Jane Anne and their two daughters, Florence and Sarah J. Power and three sons, John L., James (Jnr) and the 2 month old Ernest.
Ten years later, on census day 1901, the family had moved to 4 Chelmsford Terrace, Leeds and a new arrival, another son, Arthur had arrived.
Service record
Another 10 years later, in 1911, we find James (Snr) and his wife living at 97 Easy Street, Leeds. At that time only two of their children are still living with them, James (Jnr) and Arthur. James (Snr) was an iron driller. Ernest was not living with his parents and the 1911 census shows, and is confirmed by Ernest's service record, that on census night 1911, Ernest was one of 17 officers, 8 warrant officers, 1 other officer, 317 seamen, 79 boys and 57 Royal Marines on board HMS Mars in Portland.
Ernest's complete service record was:
24th Aug 1907 - 15th Sep 1970 HMS Ganges
16th Sep 1907 - 22nd Dec 1907 HMS Hogue
23rd Dec 1907 - 10th Jan 1908 HMS Vivid I
11th Jan 1908 - 27th Apr 1908 HMS Niobe
28th Apr 1908 HMS Suffolk
All the above with the rank of Boy Sailor
21st Feb 1909 still with HMS Suffolk Ernest became an Ordinary Seaman
29th Jun 1909 - 2nd May 1910 HMS Suffolk as an Able Bodied Seaman
31st May 1910 - 27th May 1910 Vivid I
Ernest's record then shows he spent three days in the cells, but no reason is given.
31st May 1910 - 11th Jan 1911 HMS Vivid I
12th Jan 1911 - 1st Jan 1912 HMS Mars. During this time the 1911 census recorded Ernest as being on board (see above).
2nd Jan 1912 - 14th Oct 1912 HMS Orion (probably, the writing is hard to read).
Ernest then spent another 3 days in the cells, again no reason is given.
18th Oct 1912 - 3rd Feb 1912 HMS Orion
4th Feb 1914 - 21st Feb 1914 HMS Vivid I. At this point Ernest may have thought his Naval service was over, and his record shows that he joined the Royal Fleet Reserve (RFR) on the 22nd Feb 1914. This would have been 5 years of service (excluding service as a Boy Sailor). However war was about to intervene in any plans Ernest may have had, and on the 5th August 1914, Ernest was recalled to the colours and his service continued:
5th Aug 1914 - 6th Aug 1914 HMS Jupiter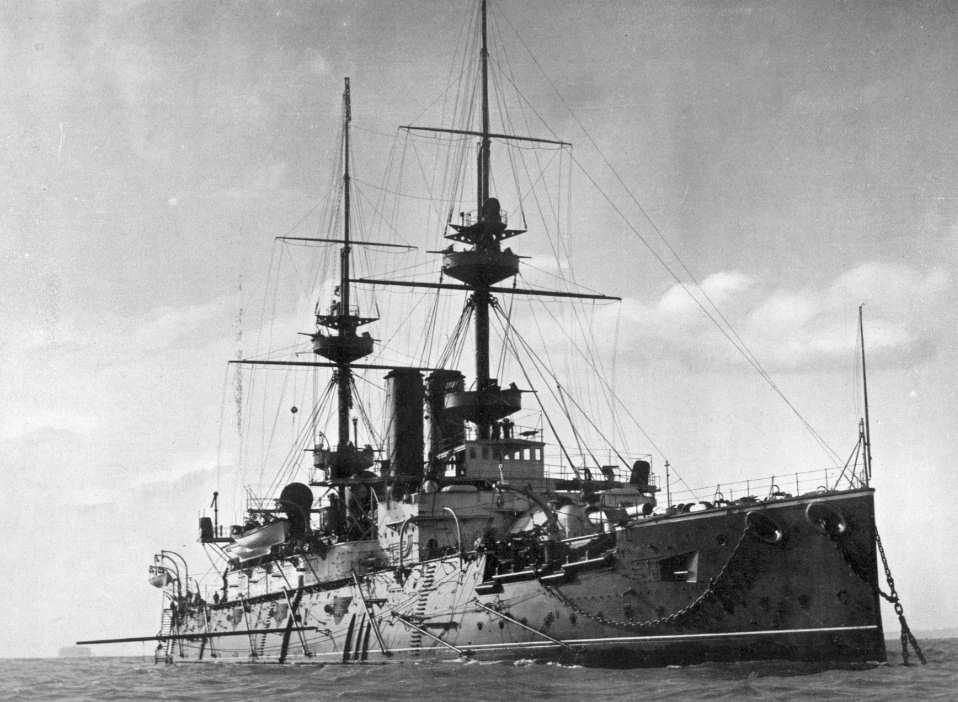
HMS Jupiter was a Pre-Dreadnought battleship and for these two days was stationed in Devonport. (Picture from Wikipedia)
7th Aug 1914 - 15th Jan 1916 HMS Severn. 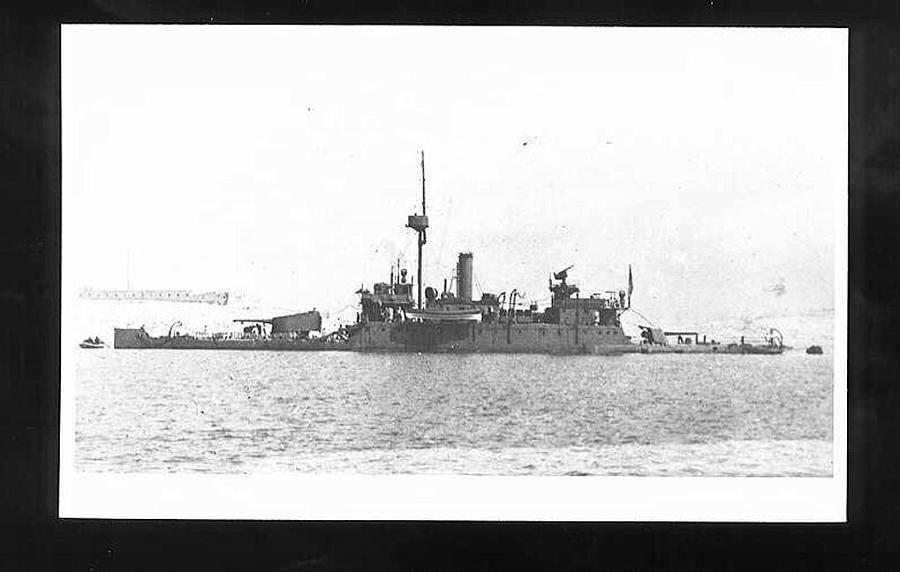
During this time the Collingham Parish magazine recorded Ernest's service, and identified he was on HMS Severn.
HMS Severn was built by Vickers in 1912 and launched on the 19th August 1913. It was one of a number of ships initially built for the Brazilian Government. Shortly before the outbreak of WW1 these ships were awaiting delivery at Barrow when the British Government stepped in and purchased them. It was commissioned in August 1914 and it seems that Ernest Power was likely to be in the initial draft of sailors who joined the ship. HMS Severn was listed by the Navy as a Gunboat or Monitor. They were lightly built, flat bottomed, unarmoured and intended for use in river conditions only. It soon became obvious that the very shallow draught coupled with the large area above the waterline exposed to the wind made them very difficult to handle in any sort of wind or sea conditions above a flat calm and the light construction would also cause problems when working in a seaway.
Two of the Monitors, HMS Severn and HMS Mersey, departed from Barrow on the 25th August 1914 with orders to reach Dover with all despatch. At this stage none of the vessels had carried out any sort of gun drill. Two days later, both ships were in the Irish Sea in a fresh breeze with their hatches battened down, Mess Decks flooded and the crew accommodated in the wardroom and captains quarters, the only spaces free of water emphasising their unsuitability for open sea-going activities. On the 29th August 1914 both vessels arrived at Dover, having taken three and a half days to steam 610 miles. On the 31st August 1914 the third ship, HMS Humber, arrived at Dover and all three vessels restocked with coal and were all ordered to Ostend for bombardment duty. They had all anchored off Ostend when the orders were cancelled and all three ships were ordered to Sheerness. The next six weeks consisted of patrol duty off the Nore and the vessels were also modified at Chatham Dockyard by having armoured plates affixed over their magazines.
In October 1914, on the 11th, HMS Severn with the other monitors, rendezvoused with destroyers to assist in the evacuation of Ostend. However on the way HMS Severn suffered from engine failure and had to be taken in tow by HMS Humber. By 6pm all three monitors were anchored off Ostend. All three ships were recalled by Admiralty to the Downs and later into Dover Harbour on the 13th October 1914. During the rest of October and November the vessels carried out many bombardment duties along the Channel Coast, to the extent that their gun barrels became badly worn and HMS Severn and HMS Mersey were both sent to Chatham Dockyard for exchange barrels to be fitted.
From mid-November 1914 until January 1915 the three monitors continued their duties in the English Channel. On the 19th November 1914 all three monitors were dispatched from the Medway, via Great Yarmout to The Wash, in response to the British Government’s fear of an invasion in the area. By 9th December 1914 they were anchored off Hunstanton at instant readiness as there was fear of an invasion the following day, but since no invasion materialised they were recalled to Dover on the 10th December. They had a very stormy trip down the East coast, coaling at Harwich prior to setting off again for Dover. This leg of the journey also proved very rough, so much so that at one time the squadron was making 50 degrees leeway and eventually turned around and returned to Harwich, where HMS Humber reported that her fore mess deck had been buckled by the seas and she was leaking badly. On the 15th December the monitors departed from Harwich, HMS Humber going to Chatham Dockyard for repairs and the other two to Dover where they coaled and departed again at 22.00 for Dunkirk. HMS Severn and HMS Mersey departed from Dunkirk for Dover on the 10th January 1915. This was another very stormy uncontrolled passage. By the 11th January HMS Severn was anchored in the River Medway with the other two monitors. HMS Severn was sent into Sheerness Dockyard for attention to leaks where it was found that at least ten percent of her rivet holes were leaking copiously. All the ships had repairs and modifications carried out whilst in the Medway, these taking until early March 1915.
Going to Malta
The next part of Ernest Power's naval career took him further from the UK.
In March 1915 work started to strengthen the monitors forward bulkheads in an effort to prevent further buckling of the decks. This was followed by visits to Sheerness Dockyard in turn where all portable fittings were removed and stowed below, all boats removed, topmasts stowed, all hatches were made watertight and the funnel tops were covered with plate. In addition special towing spans were fitted around the fore gun mountings and false breakwaters constructed on the foredecks. The senior officer of the monitors was told that the three vessels were going to the Dardanelles via Malta and Lemnos, but that due to their poor sea-keeping qualities and limited range they were to be towed rather than proceed under their own power. He was told not to tell his officers and men their destination and that during the voyage they would avoid the normal shipping lanes keeping out of sight of land wherever possible. Only if bad weather intervened he was to take refuge in ports, and even then any ports used should preferably be Portuguese rather than Spanish. During the voyage passing vessels were asked by light or flag signals not to report the position or makeup of the convoy. The tugs chosen for this epic tow were Blackcock, Sarah Joliffe and TA Joliffe from Liverpool, and Danube II, Revenger and Southampton from the Thames. Because the monitors would be towed unmanned the Royal Mail Lines SS Trent was requisitioned to carry the monitor’s officers and crews and fitted with guns and stored whilst in the Royal Albert Dock, London. She also carried the monitor’s lifeboats.
The convoy, Blackcock and Danube II towing HMS Humber, Sarah Joliffe and Southampton towing HMS Severn and T A Joliffe and Revenger towing HMS Mersey departed from the Medway at one minute past midnight on the 12th March 1915. The monitors' crews were sent by train to Devonport. On the 14th the convoy reached Devonport without incident and the monitors' crews joined the SS Trent. At 30 minutes to midnight that night the convoy, without lights, left Devonport escorted by the destroyers HMS Lookout and HMS Foyle. The destroyers stayed with the group until 1500 hours the following day when they were clear of the English Channel. On the 18th March 1915, the convoy passed Finisterre, averaging 6.5 knots since leaving Devonport. The tugs were now becoming short of coal but because of the secrecy the Admiralty had insisted that the monitors were not to be taken into Gibraltar. From the 22nd to the 24th March therefore, the tugs and the monitors swapped around. First Danube II, Southampton and T A Joliffe passed their tows to Blackcock, Sarah Joliffe and Revenger, respectively, and the three released tugs then went into Gibraltar to coal, whilst the convoy proceeded at a lower speed. When coaled the three tugs returned, a similar operation took place to release the other three tugs and they then returned to Gibraltar for coal. By the 24th all tugs could be re-connected to their original monitors and the convoy resumed normal speed. The ten vessels arrived at Malta on the 29th March 1915. Despite having encountered some rough weather in the Mediterranean all arrived undamaged and without a single towing hawser breaking. After entering Grand Harbour, Valletta, the convoy was moored in Lazaretto Creek. The tugs were almost immediately pressed into service towing lighters of military equipment to the Dardanelles and Lemnos as part of the build up before the Gallipoli Landings. However the monitors remained battened down in Malta.
Just after 10.00 am on the 4th April, orders were received for the SS Trent and the available tugs to raise steam in order to depart with the monitors. Only Blackcock, Danube II and Rescue (newly arrived from Gibraltar) were available to tow but libertymen were recalled, stores were taken aboard and all was made ready. The weather however decided not to cooperate and departure was delayed because of heavy seas running outside the harbour. The convoy remained weather bound in Grand Harbour until the 6th April when new orders were received canceling the sailing and leave was granted on all the vessels. The weather delay had meant that the convoy could not reach its destination in the Dardanelles in time for the planned operation and plans were now changed.
On the 21st April 1915 orders were received that HMS Humber would remain at Malta while HMS Mersey and HMS Severn accompanied by the SS Trent would be continuing further afield. HMS Severn and HMS Mersey had their propeller shafts disconnected so that the props could freewheel, lessening drag. Bullet proof shields were fitted around the tugs wheelhouses and all vessels were fitted with heavy canvas sun awnings. Despite warnings that secrecy must be maintained the fitting of the awnings must have been a pointer to all that they were bound for hotter climes. Four tugs, Blackcock, Revenger, T A Joliffe and Sarah Joliffe were tasked for the next stage of the tow, which was to Zanzibar via the Suez Canal - a 5000 mile journey. The coal capacity of the tugs continued to be a worry for the commander especially as rough weather could well be encountered in the Red Sea and it was decided that the SS Trent and the Kendal Castle, a collier carrying 6000 tons of coal which had been attached to the convoy would also be fitted with towing gear, so that they could be used for towing if necessary.
On to East Africa
The convoy departed from Valletta's Grand Harbour in perfect weather and sea conditions on the 28th April 1915. Blackcock and Revenger had only recently returned from Lemnos and were still in dockyard hands so their place was taken temporarily by Southampton. HMS Mersey was towed by Sarah Joliffe and HMS Severn by Southampton and T A Joliffe. The collier Kendal Castle brought up the rear and SS Trent took up her customary position on the port beam. On 2nd May Kendal Castle was detached and sent on ahead to Port Said to make arrangements for coaling the convoy. She was under strict orders that no shore leave was to be granted, no strangers allowed on board and all letters must be censored. On 3rd Blackcock and Revenger caught up with the convoy and Southampton returned to Malta. On arrival at Port Said the convoy topped up with coal, water and provisions in seven hours and then entered the Suez Canal. By the 6th May 1915 the convoy was out of the Suez canal and encountered rough seas from astern.
9th May 1915 was a day full of excitement for the convoy. At 5am the SS Trent intercepted a radio message being passed from one German warship to another. Worried that there might be enemy ships nearby the convoy reversed course and headed back toward Suez where there were allied warships. The tugs were ordered to make preparations for slipping the tows if ordered and if this took place to scatter and head back for Suez independently. However by 8am, after failing to make radio contact with the naval units at Suez, and hearing no more exchanges from the German ships they decided to reverse course again and continue on towards Aden. Finally, just before midnight, a large steamer was seen astern rapidly overhauling the tugs. Almost with reach of the convoy she suddenly doused all her lights. Fearing this to be a German raider SS Trent immediately swung towards the stranger at full speed. However an exchange of light signals identified her as the British transport Trioba bound for Bombay and that she had suddenly had a dynamo failure. With apologies and best wishes exchanged all became peaceful again. The following two days were very hot and the commander decided that, if the sea state allowed, he would send some ice and fresh meat to the tugs. This happened on the 11th May. Over the next few days the temperature at night rarely fell below 87 degrees and on Sarah Joliffe one engineer and a firemen were rendered unconscious when her engine room temperature reached 145 degrees one afternoon. On T A Joliffe, two firemen also succumbed as did Blackcock's mate. Lime juice was issued instead of rum and it became necessary to use salt water for washing. Many of the tug crewmen were aged between 45 and 65 and the tugs had not been built or modified for tropical service and therefore possessed no fans or iceboxes. Despite all this the average daily run down the Red Sea was 157 miles. On the 12th the Kendal Castle was again sent on ahead to Aden to make arrangements for the convoy’s arrival. On the 15th May 1915 the squadron was anchored off Aden. Unfortunately the 2nd engineer of the Trent died from heat stroke during the morning as did a member of Severn’s crew, also aboard Trent, during the following night. Several of the tugmen were placed under the care of Trent’s doctor for a couple of days.
On the 17th May the convoy left Aden after the tugs had been supplied with Arab firemen, ice and ice chests. Further measures were then put in place a further coaling from Kendal Castle. That ship was first despatched with orders for her to seek sheltered water off Cloch, Italian Somaliland, so that the tugs could coal from her. Blackcock, and Sarah Joliffe then first made their way to the anchored collier before returning to the monitors and relieving their sister vessel so that they could bunker, carrying out a similar procedure as that undertaken off Gibraltar. Whilst this was going on the vessels were invaded by a huge swarm of locusts and temperatures reached over 100 degrees in the shade. On the 19th May, the convoy met up with HMS Chatham, proceeding in the opposite direction. Chatham signaled the unwelcome news that they were heading into an area of strong SSW winds and adverse currents.
On the 20th May Cape Guardafui was rounded at a distance of three miles. The weather was now cooler but almost immediately the convoy encountered the strong SSW winds and adverse currents advised by HMS Chatham. The daily distance run dropped to 77 miles and for three days the convoy hugged the coast but then abandoned this course as the currents here were running at up to five knots. By the 22nd May 1915 Commander Fullerton in the Trent realized that at the current rate of progress the tugs would run out of coal before reaching Zanzibar. Therefore, despite the rough seas, SS Trent took over the towing of HMS Mersey. This much improved the rate of progress and Kendal Castle was then employed to partially tow HMS Severn. Under these new towing arrangements the convoy made 142 miles on the 24th May. About this time the officers of the ships were told of their destination and the nature of their operations. They were to sail to Chaki Chaki Bay on the Isle of Pemba, NNE of Zanzibar. There they would fit out the monitors and eventually enter the Rufiji river to destroy the German light cruiser Konigsberg. Konigsbery had been sent on a two-year deployment to East Africa but when war started she attempted to raid British and French commercial traffic in the region, but only destroyed one merchant ship in the course of her career. Coal shortages had hampered her ability to attack shipping, but on 20th September 1914, she surprised and sank the British protected cruiser HMS Pegasus in the Battle of Zanzibar. The Königsberg then retreated into the Rufiji River to repair her engines, but she was located before her repairs could be completed . The locating British cruisers were unable to steam into the river to destroy Konigsberg, but had set up a blockade. The British monitors, with their shallow drafts designed for river work, would now take on the Konigsberg in the Battle of Rufiji Delta. However that was still to come. They had first to complete their mammoth tow from the UK.
At 3am on the 25th May 1915 a thick fog descended on the convoy which did not lift until noon. At that time the Trent realised that the convoy was out of touch with the T A Joliffe and the Revenger. Kendal Castle signaled that she had last seen the T A Joliffe three miles away to port and that at 6am Revenger had got athwart the tow line and had to slip the tow. The crew of Kendal Castle had managed to recover some of the tow but had to sever the remainder and let it sink to the sea bed. Revenger had then steamed off in search of SS Trent. At sunset SS Trent pointed her searchlights at the sky in the hope that the missing tugs would be able to locate her. T A Joliffe had previously been informed that if she lost contact with the convoy to proceed independently to either Mombasa or Pemba Island. At 8pm two green lights were noticed a long way off to port, and at 21.15 three red lights, signifying "in need of assistance", were noticed. The Trent, still towing the monitor, gradually altered course to close to the lights. By 10pm the vessel was identified as Revenger. Revenger then reported having two injured men on board, one of them in a serious condition. Her 2nd Mate and cook had apparently been injured when she slipped her towing hawser which is why she had gone off in search of SS Trent. The injured men were now transferred to SS Trent so that their injuries could be treated.
On the 26th May 1915, with 700 miles still to go the Kendal Castle reported that HMS Severn had developed a heavy list to port. A party boarded the HMS Severn and found two feet of water on the mess deck and along the port side. This appeared to have been caused by loosening of the rivets in the hull. Relays of men were sent over to pump and bail out the water. Having pumped out most of the water on the 27th May 1915 the leaks were sealed with lead wire and oakum, all whilst still being towed at 5 knots. On the 28th May 1915, The weather had improved a little and although a strong swell was still running the noon to noon distance run was 149 miles, the best distance covered since leaving Aden. During the afternoon the Equator was crossed, albeit without much celebration. On the 29th another 153 miles were run towards their destination and wireless communication was established with Admiral King-Hall at sea off Pemba Island, who informed them that the T A Joliffe had already joined him. HMS Severn however had developed another list to port and HMS Mersey was seen to be considerably down by the head.
The weather had now changed to rainy squalls with overcast skies and for the next 36 hours no sights could be taken. By the 31st May at midday dead reckoning placed the convoy 47 miles NE of Pemba Island and some 28 miles off the African coast. It was decided now to change the towing arrangements again so HMS Mersey was towed by Sarah Joliffe and Revenger whilst Blackcock towed HMS Severn alone. This changeover took some three hours during which the ships drifted North with engines stopped. Getting under way again consequently found them thirteen miles abreast of Mombasa from whence came a steam launch carrying the examination officer. Fullerton, commanding the convoy from SS Trent, impressed on this officer the need for total secrecy to which the officer replied that he had been expecting them for some days as a Norwegian steamer had reported them after passing the convoy at sea.
On the 1st June 1915, the Blackcock was unable to tow the HMS Severn any more than two miles an hour and so Revenger and Sarah Joliffe were ordered to proceed independently to Chaki Chaki with HMS Mersey. Later in the morning the remainder of the convoy caught up with HMS Mersey and her tugs stopped close to Kegomacha lighthouse on Pemba Island. Both tugs were flying signal flags indicating they were aground. SS Trent anchored close to them and lowered her boats. Reaching the tugs Sarah Joliffe was found hard aground on a coral reef. Revenger was still afloat but with her tow wire snagged on an obstruction on the sea bed. On taking soundings HMS Mersey was found to be still afloat but with seven inches of water beneath her bottom and the tide ebbing. Kendal Castle was ordered to take the towing of Severn from Blackcock. Once free Captain Weir backed Blackcock in close to HMS Mersey’s stern, very conscious of the facts that his tug drew at least twice as much water as the monitor. With great haste monitor and tug were connected and the monitor towed stern first into deeper water. The immediate danger over the convoy got under way again, Blackcock still towing HMS Mersey and Kendal Castle towing HMS Severn. Revenger was left standing by Sarah Joliffe. During the afternoon they closed Chaki Chaki and made contact with HMS Hyacinth, who was in company with T A JOLIFFE, the latter very short of coal. SS Trent now took over the tow of HMS Mersey and Blackcock and T A Joliffe were ordered into Chaki Chaki to coal from HMS Hyacinth. Admiral King-Hall on HMS Hyacinth had not appreciated the amount of work that would be involved in making the monitors fit for action again so decided to send them on to Barakuni Island, 200 miles further south and much nearer the Rufiji. The remnants of the convoy therefore plugged on against the current and worsening weather, making little better than three knots.
On the 2nd June 1915 Blackcock and T A Joliffe rejoined after coaling and a wireless message was received saying that Sarah Joliffe had floated off the reef, undamaged, on the high tide. Revenger had been forced to slip her towing gear, now all lost on the sea bed. She had also snapped off two propeller blades. On the 3rd June 1915 at 7pm at last the tow was over. The SS Trent was at anchor off Barakuni Island with a monitor lashed either side and the work to make them fit for action had commenced. How and where the propeller of Revenger was repaired is unknown but she did rejoin and was present during the action during which the monitors entered the Rufiji described below. From the 12th June to the 4th July HMS Severn was based at Mafia Island. The crew was employed firstly in adding armour plating to the ship, but then moved into a phase of practice. The gun crews practiced on most days and some of this was coupled with practice in communicating with aeroplanes and spotting the fall of shells from the air. This was important because in the river delta the ships could not get close enough to Konigsberg to spot their own fall of shot and therefore corrections to aim or distance could only be achieved by air observation. Another exercise involved mooring practice. This was the practice of anchoring the ship head and stern for firing at a static targets. This was achieved by dropping out a stern anchor while under way on the desired heading and allowing the desired length of chain to run out before checking the way. Then the bow anchor was dropped and the ship hauled astern until it was midway between the two anchors. This provided a stable gun platform. In theory this sounds simple but was very difficult in practice. On the 2nd July the crew took sand and sandbags on board to provide protection and then over the course of the 3rd and 4th July all excess gear and equipment was moved to the Trent. Finally on the 5th July 1915 HMS Severn, with Ernest Power on board, in company with HMS Mersey, set sail for the Rufiji river mouth, anchoring on the 5th July at 10.27 pm seven and a half miles from Kikunya mouth (see Map).
The Battle of the Rufiji
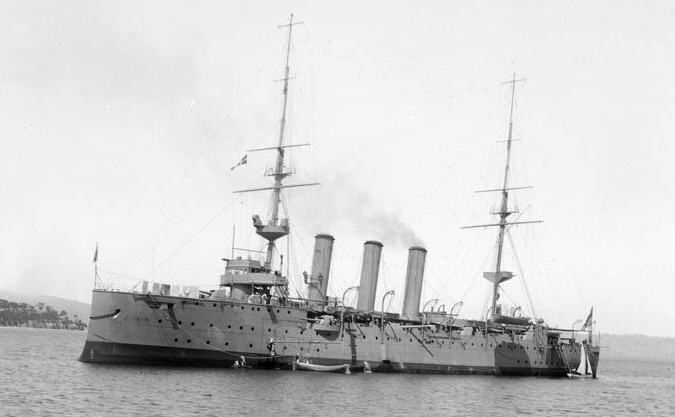
At the outbreak of World War I, the German cruiser Königsberg was ordered to attack British commerce around the entrance to the Red Sea. A lack of coal hampered its efforts but on 6 August, Königsberg found a British ship off the coast of Oman, the freighter City of Winchester and captured it. After removing its crew and coal the freighter was sunk. In August the British bombarded Dar es Salaam and destroyed the German wireless station there. By this time, Königsberg's engines required a thorough overhaul, in a secluded area where the work could be completed. Konigsberg's captain settled on the Rufiji Delta, and on 3 September 1914 at high tide, Königsberg passed over the bar at the mouth of the Rufiji and slowly made her way up the river. The Germans posted coast watchers at the mouth of the river to watch for British ships searching for Konigsberg. They observed the British cruiser HMS Pegasus patrolling the coast for two weeks. The Germans deduced that Pegasus would have to refuel in Zanzibar and decided to attack Pegasus in Zanzibar before beginning the engine overhaul to Konigsberg. On 19 September, Königsberg left the Rufiji and arrived off Zanzibar the following morning. She opened fire at a range of about 7,000 meters (23,000 ft) at 05:10, starting the Battle of Zanzibar; within 45 minutes, HMS Pegasus caught fire, rolled over to port, and sank. After sinking HMS Pegasus, Königsberg bombarded the wireless station and dumped barrels filled with sand into the harbor entrance to simulate mines. While leaving the harbour, Königsberg spotted the picket ship Helmut and sank her with three shells. The cruiser then returned to the Rufiji River so work could begin on overhauling her engines.
The sinking of the HMS Pegasus convinced the British that Konigsberg was still in the area and would pose a threat to troop transports to and from India so they decided to track down and sink the Konigsberg. On 19 October, the cruiser HMS Chatham found the German East Africa Line ship Präsident at Lindi. A boarding party searched the ship and discovered documents indicating she had supplied Königsberg with coal in the Rufiji the previous month. Acting on this, on 30 October, the cruiser HMS Dartmouth located Königsberg in the Rufiji delta. The cruisers HMS Chatham, HMS Dartmouth, and HMS Weymouth therefore blockaded the Rufiji Delta to ensure the Königsberg could not escape.
On 3 November, the British began a bombardment of the Konigsberg and another ship, the Somali, which was with her. In addition the British successfully sank a collier, the Newbridge, on 10 November in the main channel of the delta as a blockship to prevent Königsberg's escape, though the German raider could still put to sea via other channels. The bombardments persuaded the German captain to move Konigsberg further upriver, to make it more difficult for the British to destroy her. The British also brought air power into play commissioning private and Royal Naval Air Service planes to find and even bomb the ship. Despite finding the Konigsberg, they were unable to destroy her. The British also used the 12-inch guns of the old battleship HMS Goliath to sink the cruiser. Again without success as the shallow waters of the delta prevented the battleship from getting within range.
At this point, the Germans reduced the crew of the Konigsberg to 220 to keep the ship in fighting condition. This was not enough, however, to permit the ship to go to sea. Königsberg moved further up the river on 18 December. Plans to rescue the Konigsberg and for her break out and return to Germany were thwarted by the British sending two cruisers and several smaller vessels to trap her in the river. Königsberg had in the meantime been moved a third time, even further upriver. Finally, in April 1915 the two British shallow-draft monitors, HMS Severn and HMS Mersey, capable of navigating the Rufiji River were, as we have seen, sent to East Africa. The stage was now nearly set for the Battle of the Rufiji Delta.
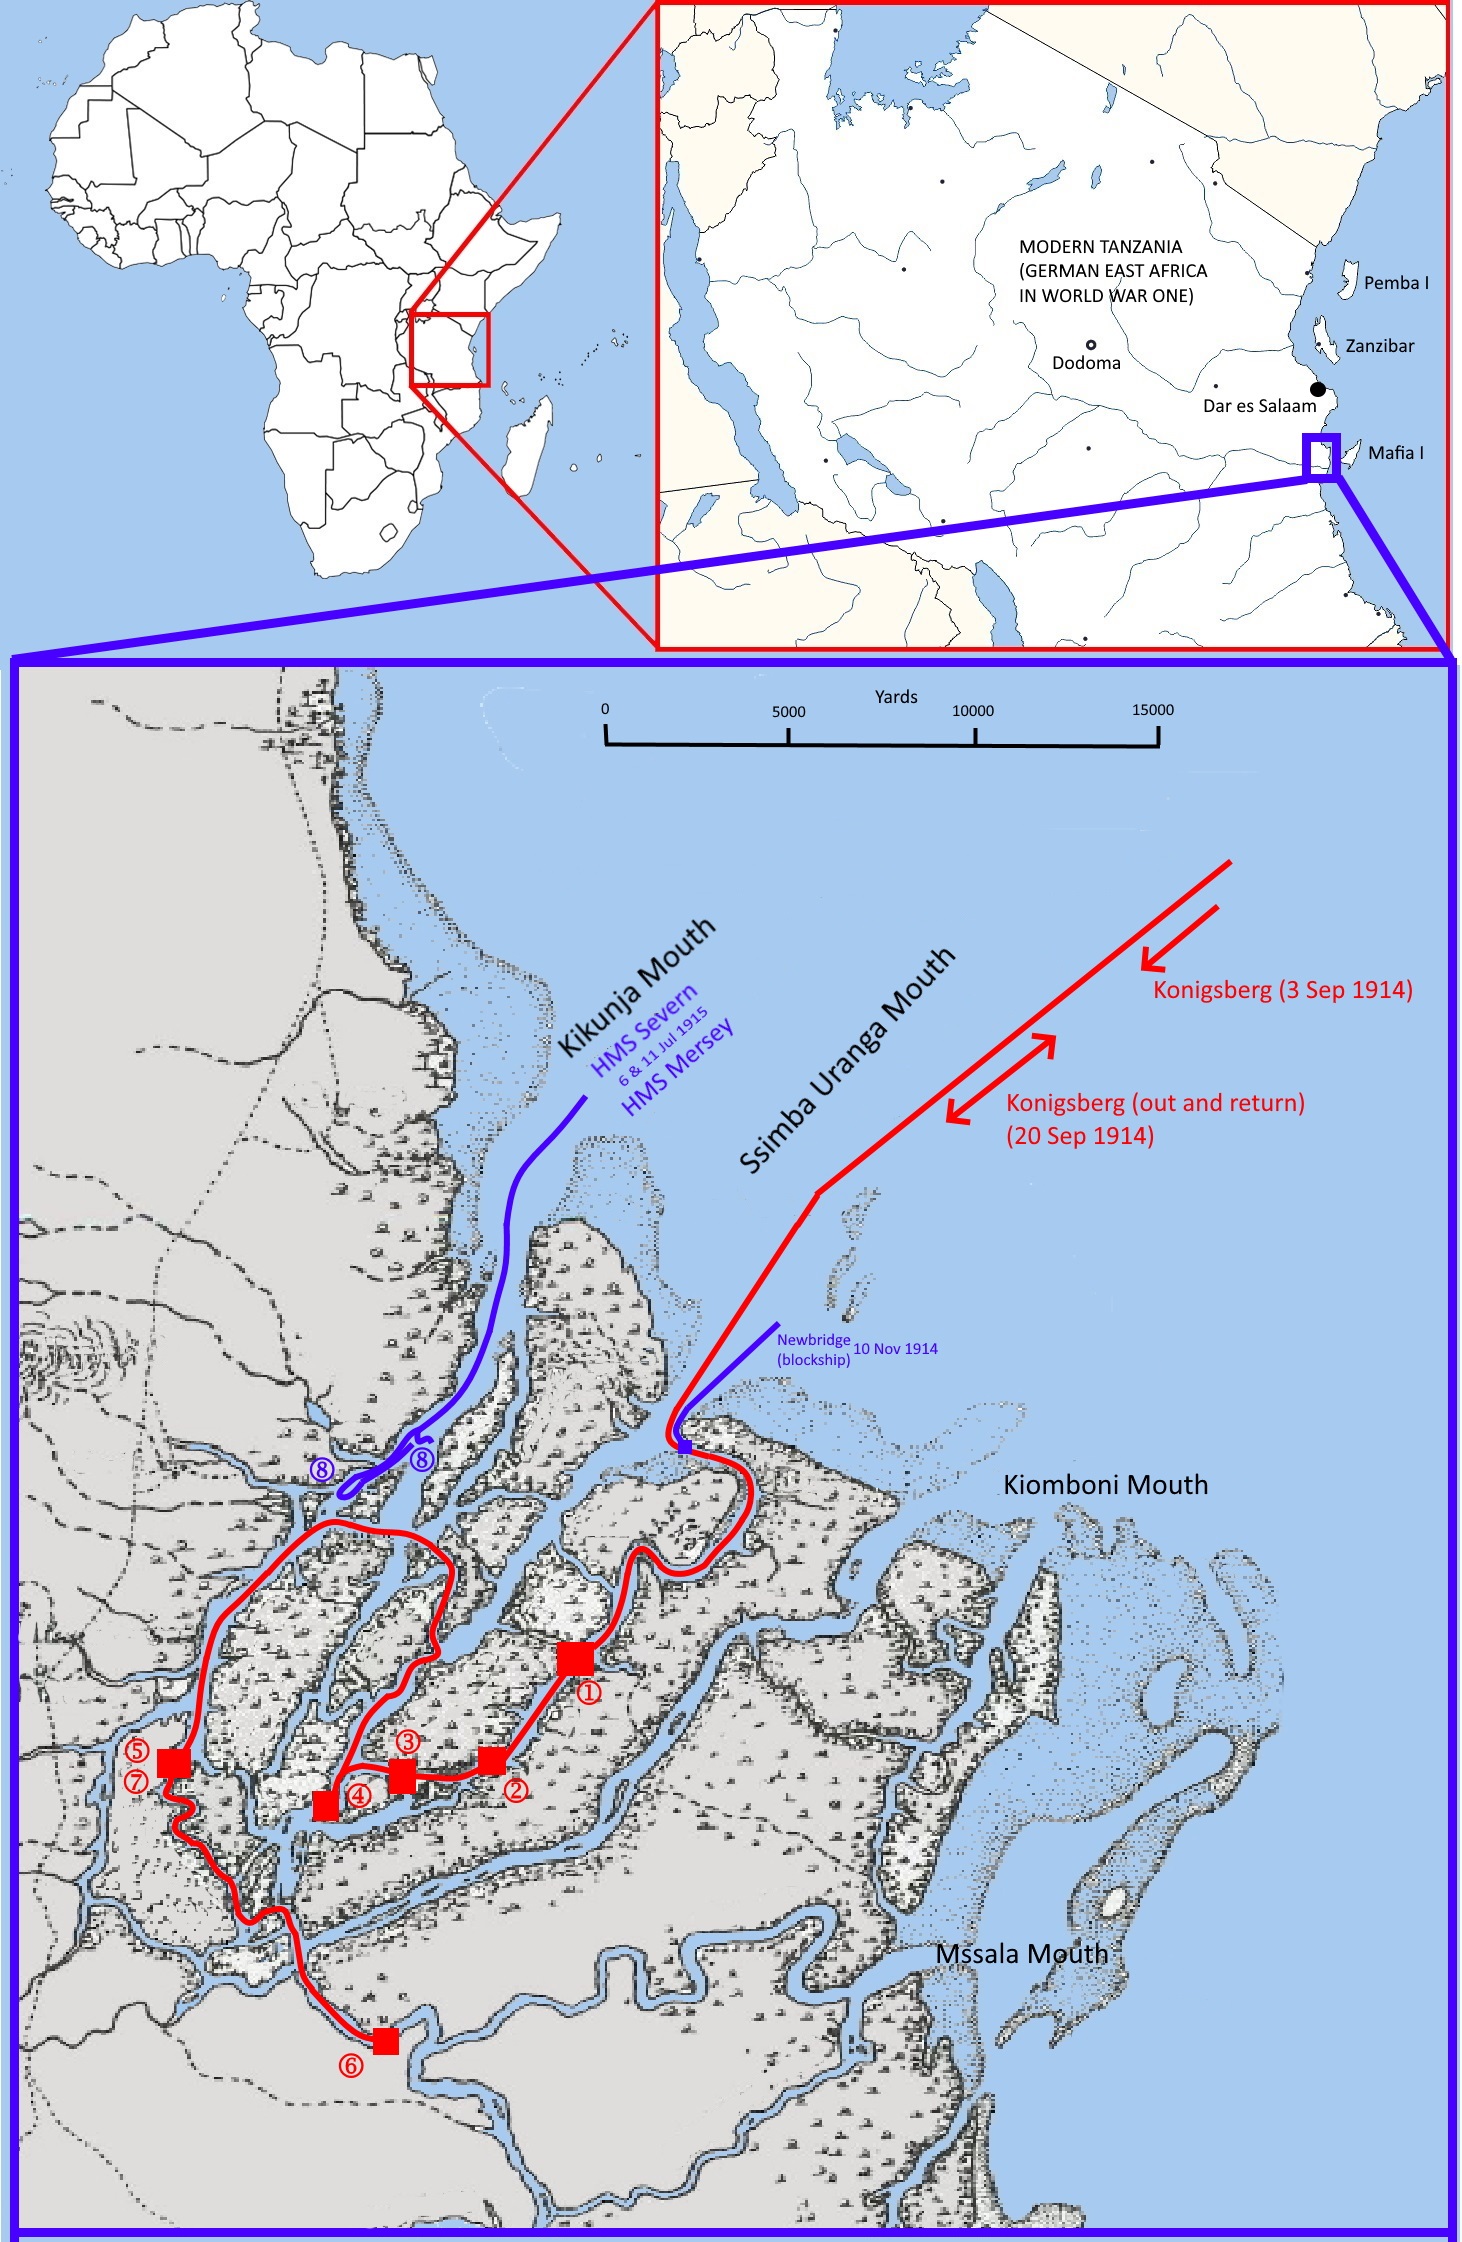
Map 1: The Battle of the Rufiji. The location in Africa of the detailed map is shown in the two upper panels. The Konigsberg entered the river at high tide on the 3rd September 1914 and anchored at location 1 from the 3rd to the 13th September. On the 20th Sep it sailed to Zanzibar and attacked that port and returned to the Rufiji. From the 3rd to the 4th November it was at location 2. From the 4th to the 15th Nov it was at location 3. During this time the British sank the Newbridge to block one escape route from the river. Konigsberg was at location 4 from the 15th to 17th November 1914. From then until the 18th Dec it was at 3 and then moved to location 5 on the 18th December. Konigsberg pushed further up river on the 19th December to location 6, returning on the 14th April 1915 to location 7. It was sunk in this position on the 11th July 1915 by fire from HMS Severn and HMS Mersey (firing from location 8).
On 6 July 1915, HMS Severn and HMS Mersey crossed the outer sandbar and steamed up the river, despite heavy fire from German positions on the river banks. They stopped at a point they thought to be 10,000 yd from Königsberg, which would be in range of their own 6-inch guns but farther than the smaller German guns could reply. Aircraft were used to spot the fall of shot. The monitors' navigation was faulty, however, and after opening fire, they found themselves to be within range of Königsberg's guns. She hit Mersey twice in the engagement; one shell disabled the forward 6-inch gun, and another holed the ship below the waterline. Königsberg was hit four times in return, one shell striking beneath the waterline and causing some flooding. In the span of three hours, Königsberg forced both British ships to withdraw.
By the 7th HMS Severn was back at Tirene Bay, Mafia Island, repairing, restocking and clearing their propellor until the 11th July. That day they set off again for the Rufiju delta. The story of the battle can be told from the logbook of HMS Severn for the day:
7.50am: Cast off from HMS Trent and proceeded in tow of tug Blackcock.
10.27am: Slipped Blackcock.
11.35am: Opened fire with fore 6-inch on boat crossing entrance and on banks with light guns.
11.36am: Enemy opened fire from banks.
11.45am: Entered river.
12.12pm: Königsberg opened fire, shots falling short.
12.23pm: Anchored and moored five miles above Ras Simba Uranga.
12.30pm: Opened fire with 6-inch on Königsberg, indirect fire, aeroplane spotting. Königsberg’s fire very accurate.
12.39pm: Commenced hitting Königsberg.
12.52pm: Aeroplane hit and descended, crew rescued.
12.54pm: An enormous explosion in Königsberg.
1.0pm: Königsberg ceased fire.
1.47pm: Ceased fire. HMS Mersey passed up river to decrease range.
2.0pm: Unmoored and anchored in midstream in sight of Mersey.
2.09pm: Mersey moored and opened fire.
2.30pm: Sent up topmast, observed Königsberg heavily on fire.
2.55pm: Weighed and proceeded down river in company with Mersey.
4.30pm: In tow of Blackcock, course for Tirene Bay.
5.0pm: HMS Weymouth flying C-in-C’s flag closed. Cheered ship.
7.50pm: Secured alongside Trent.
During this five-hour bombardment Konigsberg's fire decreased as the ship was hit - at 12:12, Konigsberg fired with with four guns, but only three guns remained in action after 12:42, two guns after 12:44, and one gun after 12:53. The two monitors returned fire at 12:30, once they had been anchored into their firing positions, and scored several serious hits that caused a major fire at the Konigsberg's stern and inflicted heavy casualties. By 13:40, Königsberg had run low on ammunition and her gun crews had suffered very heavy casualties, and the crew was ordered to drop the breech blocks for the guns overboard to disable them and to abandon ship. Two torpedo warheads were detonated in the ship's bow to scuttle her; the ship rolled over slightly to starboard and sank up to the upper deck with her flags still flying. Nineteen men had been killed in the battle, with another forty-five wounded.
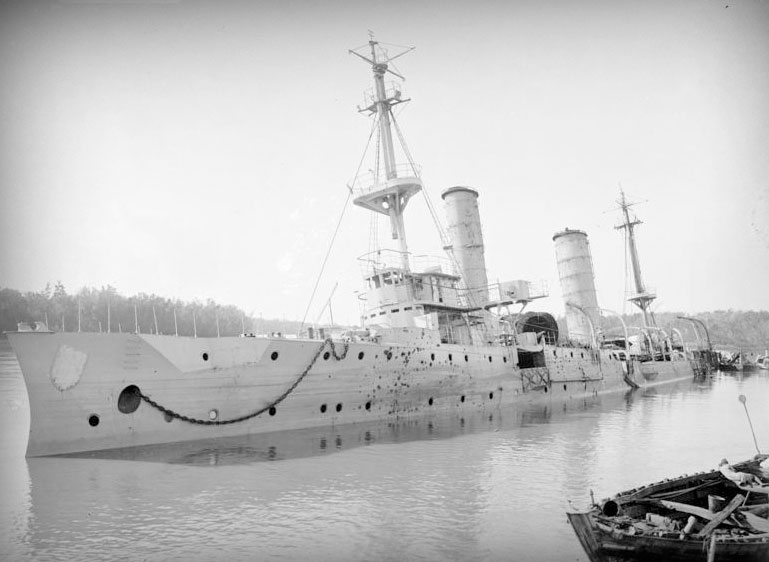
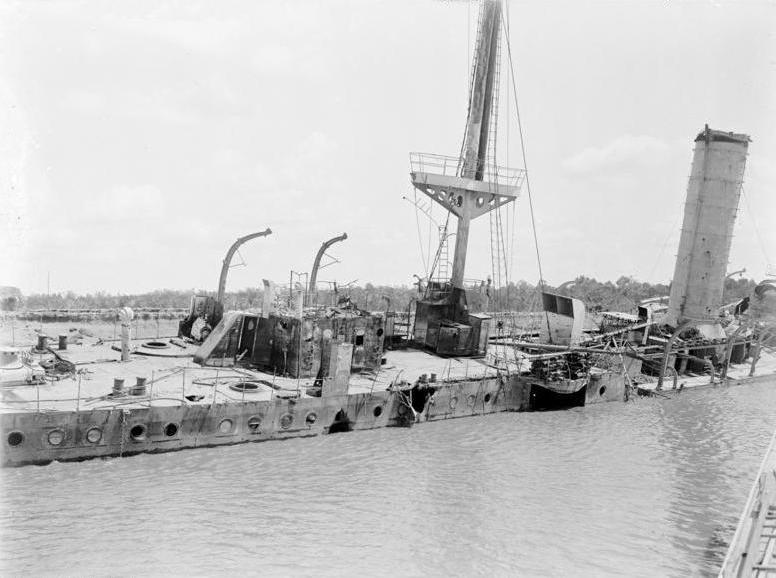
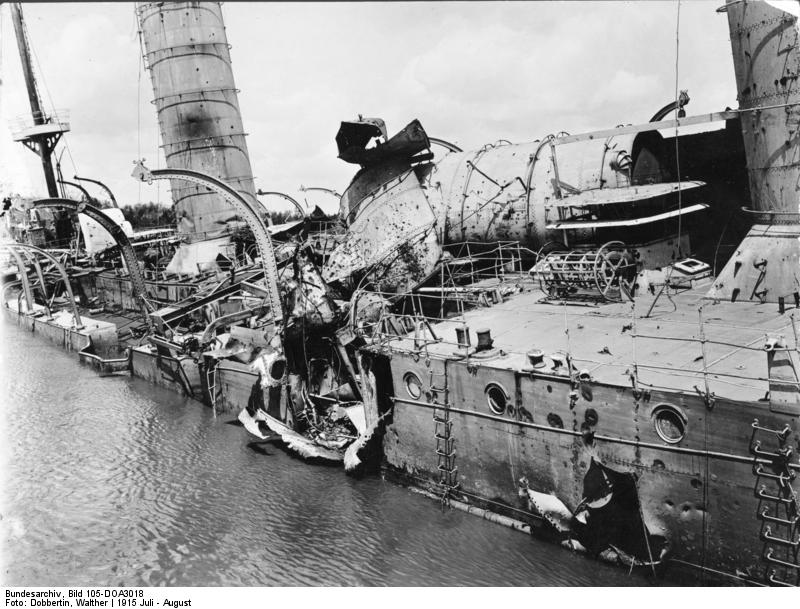
Konigsberg. Photographs showing the damage caused during the battle and the scuttling of the ship. (From Wikipedia and the Bundesarchiv photograps Bild_105-DOA3013 and Bild_105-DOA3018.
July 1915 to January 1916 - HMS Severn
Ernest's service record shows he served on HMS Severn until the 15th January 1916. After the attacks on the Konigsberg in July 1915, HMS Severn remained in the area, based mainly at Mafia Island, as part of the East Africa Station. The Navy's role was primarily to protect British shipping from German surface raiders, but the monitors' roles (HMS Severn and Mersey) were mainly in coastal patrols.
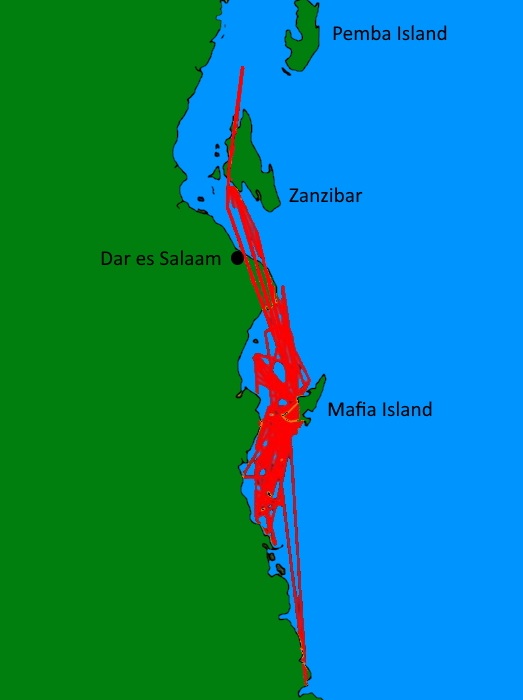
The voyages of HMS Severn from July 1915 to January 1916 when Ernest Power was serving on board. The route tracks are made by simply joining the positions of the ship given in the log books of HMS Severn (PRO). This sometimes results in the tracks appearing to go overland.
There were occasional bouts of action. For example, on the 19th August 1915, the Severn entered Tanga harbour and opened fire on a mine lighter and the German steamer Markgraf causing the lighter to blow up. The Three men were wounded during this raid. On the 4th September, the Severn was off Simba Uranga river mouth when they observed a boat pulling across the entrance and landing men who entered a hut so the Severn fired a number of shots at the hut. Other trips and attacks were made around the Rufiji river delta. On the 14th September, the Severn enetered the Simba Uranga river mouth at 5.15am, passing the blockship Newbridge at 5.31am. They sighted a boat which they captured along with one white and four natives. Later they sighted and fired at the steamer Wami. This ship escpaed up Fissini Creek so the Severn stooped off Salale and sent a motor boat up Fissini Creek, while the Severn opened fire and destroyed store houses at Salale. The ship was also involved in reconnaissance, for example on the 30th August 1915 they anchored off Simaya Island and sent a landing party ashore who reported that the island was deserted and in October in surveying Chole Island.
According to Ernest's record his last day on the crew of HMS Severn was the 15th January 1916. The ship's log shows some excitment on this day. The ship was in Zanzibar and the log records that at 10am a Court Martial was held on board, without explaining what it was for. The log also records that at 3.20pm one rating was discharged to HMS Challenger. At the same time, the log of HMS Challenger records, at 3.30pm "Received one rating (prisoner) from HMS Severn". We do not know if this was Ernest Power. His service record records his character on transfer as being 'very good' and there is no mention of any punishment at this time, however this is the only transfer recorded for these days from Severn to Challenger, at a time when we know that Ernest was transferred from one to the other.
16th January 1916 to 11th January 1918 - HMS Challenger.
Whatever the reason for his transfer, Ernest served for the next two years on HMS Challenger. HMS Challenger was a second-class protected cruiser of the Challenger-class of the Royal Navy. She had been laid down in 1900, launched in 1902 and commissioned in 1904 and served in the Australia Station. In 1912, she was paid off into reserve but was recommissioned for the First World War. She initially served as part of the Ninth Cruiser Squadron off West Africa before serving in East African waters.
12th Jan 1918 - 13th Jun 1918 HMS Vivid II
14th Jun 1918 - 17th Mar 1919 HMS President II
There is then a gap in the record, which continues:
13th Apr 1921 - 9th Jun 1921 HMS Vivid I.
Ernest was demobilised on the 9th June 1921.
After the war
After the war, Ernest seems to have returned to Yorkshire and in 1939 we find him, still single, living at 23, Charles Avenue, Leeds with his widowed mother Jane.
We believe Ernest may have died in Leeds in 1957, but cannot be certain, and we have found no direct connection to explain why Ernest was named in the Collingham Parish Magazine in 1914.
Biography last updated 04 August 2020 12:36:42.
Sources
1911 Census. The National Archives. Class R14 Piece 12373
The Collingham Parish Magazine Dec 1914 & Feb 1915
Royal Navy Register of Seamen's Service (ADM188). The National Archives.
Royal Navy Roll of War Medals. The National Archives. (ADM171/112)
If you have any photographs or further details about this person we would be pleased to hear from you. Please contact us via: alan.berry@collinghamanddistrictwararchive.info